How to share a YouTube video on Instagram Story, Reel, Bio, DM
Want to know how to share a YouTube video on Instagram Story without losing clicks or making it look low-quality? I pulled the fastest 2026 workflows together with help from the Zeely team, based on what Instagram supports today and what actually drives taps.
To share a YouTube video on Instagram, choose a link or a clip. Use a link when you want traffic fast. Copy the YouTube URL, open Stories, tap Stickers, tap Link, paste the URL, rename the sticker (like “Watch on YouTube”), and post.
Use a clip when you want reach. Download your own video, trim, crop, add captions, and publish as a Reel with a clear CTA to your Story link or bio link.
Instagram won’t reliably post a full YouTube video for you in one tap. The clean workaround is simple: use Stories when you need a clickable link, and use Reels when you want discovery. In this guide, I’ll show you every quick method that works in 2026, plus the fixes when links or uploads fail.
How to share YouTube video on Instagram via link vs clip
How to share YouTube video on Instagram starts with one decision: do you want clicks or reach. If you want traffic to YouTube, share a link. If you want discovery, post a short vertical clip as an ig video and push people to your Story link or bio link.
Here’s the quick decision tree I use:
- Traffic: Instagram Story link sticker first, then repeat the same URL in your bio
- Reach: Reel clip that earns watch time, shares, and sends
- Saves: carousel with “steps + payoff,” then point to the full video
- Warm audience: DM the YouTube link with one clear reason to watch
Where links actually work on Instagram:
- Clickable: Story Link sticker, bio Links section, DMs
- Usually plain text: captions, comments, and text on the video itself
If the real value lives in the full YouTube watch, lead with a link. If the value can land in 15–45 seconds, lead with a Reel and treat YouTube as the next step in your instagram for youtube flow.
Reels distribution tends to reward tight clips that hold attention and get shared, so Hootsuite reminds you to keep your preview short and focused.
Quick how to pick
- Traffic: use a YouTube link in an Instagram Story link sticker, plus your bio link
Example: a creator promoting a full tutorial - Reach: post an Instagram video as a Reel with one strong moment
Example: a business showing one before-and-after result - Trust: preview the proof, then link to the full breakdown
Example: an educator teasing the exact steps - Speed: DM the YouTube link to people who already care
Example: ecommerce replying to a product question with a demo
CTAs that get taps
Use a calm promise and a clear next step. These are safe, high-performing options:
- “Watch the full video”
- “Full tutorial on YouTube”
- “See the exact steps”
- “Watch the 2-minute demo”
- “Part 2 is on YouTube”
- “Want the full breakdown? Tap here”
Avoid loud, vague CTAs like “LINK!!!” or “DON’T MISS THIS.” They don’t tell people what they’ll get, and they can reduce trust. If you’re sharing from desktop or trying to manage instagram stories online, keep it simple: you can prep the link anywhere, but Story publishing usually finishes best on mobile.
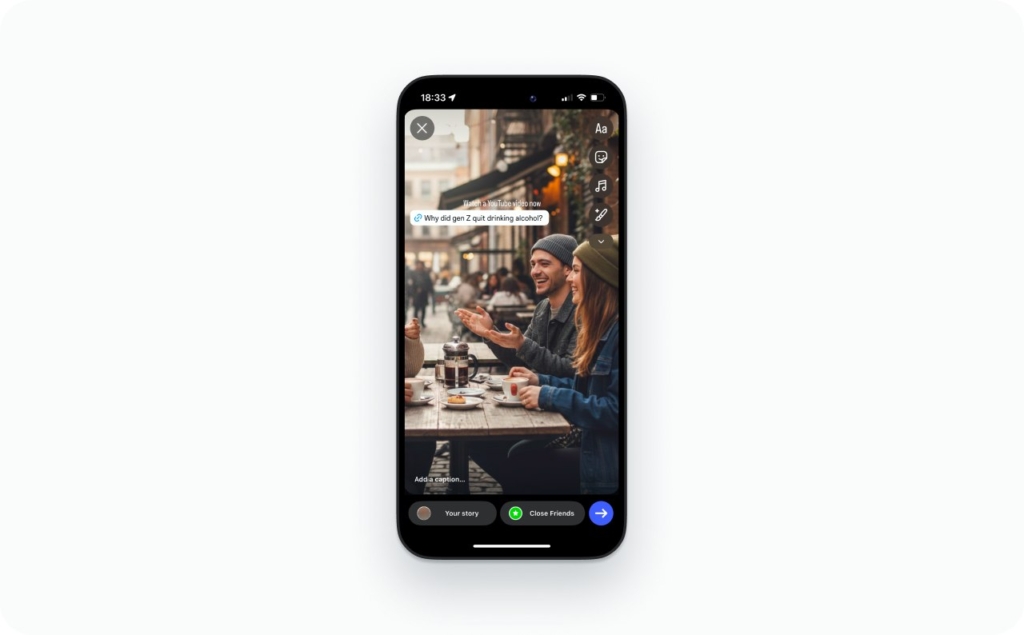
How to share YouTube video on Instagram Story with the link sticker
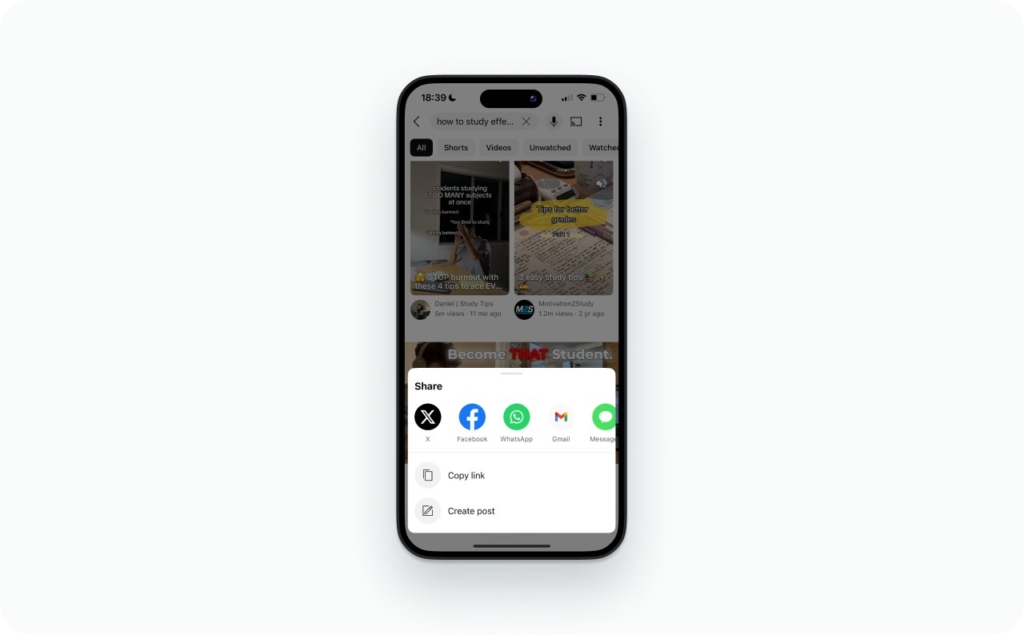
How to share a YouTube video on Instagram story is a six-tap job: copy the YouTube link, add it with the Link sticker, name it clearly, and post.
- In YouTube: Share, then Copy link
- In Instagram: tap Your story
- Pick a background (thumbnail screenshot or a short preview clip)
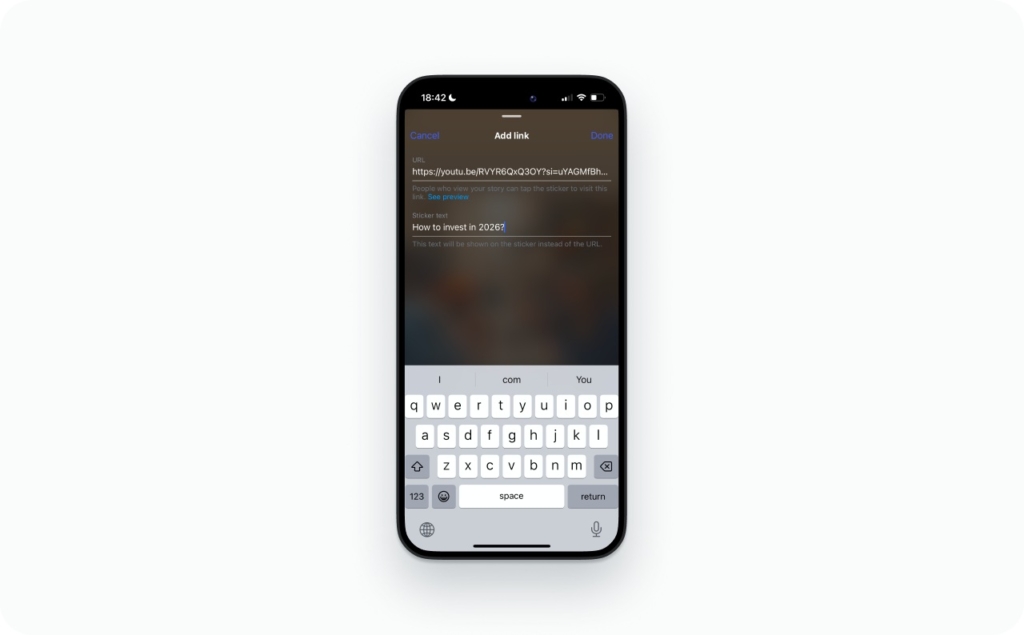
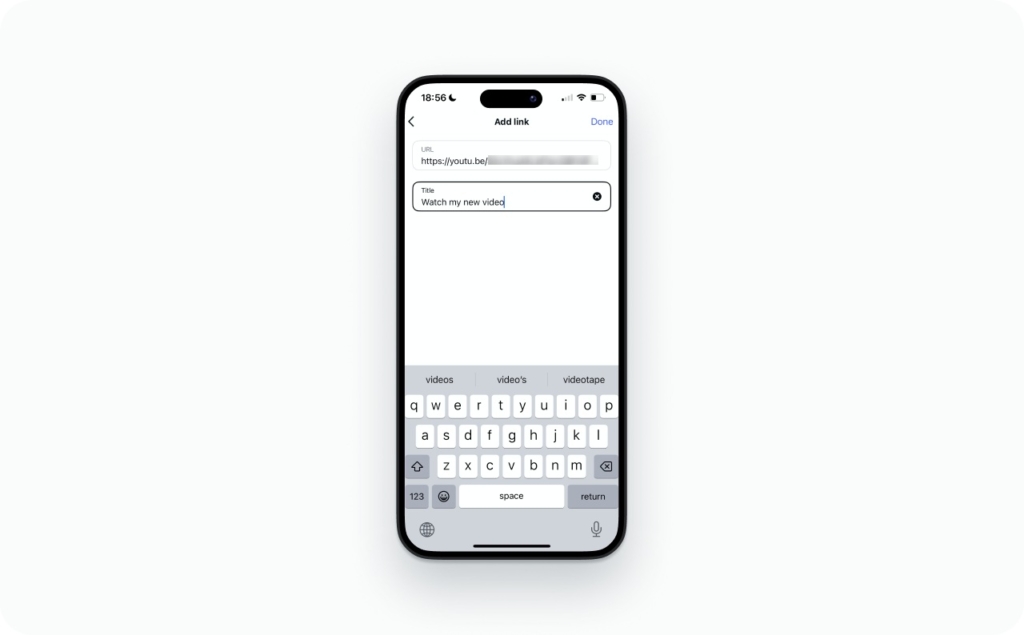
- Tap Stickers, then Link
- Paste the URL, tap Done
- Rename the sticker text, place it, and publish
Your Story should answer three things at a glance: what the video is about, what someone gets from watching, and where to tap. I keep it simple: one benefit line, one CTA line, and the sticker placed in the middle area so it’s easy to hit.
Use a single video link when you’re promoting one topic today. Use a playlist when it’s a series and order matters. Use your channel when the goal is subscribers and you want people to choose their next watch. Read now a detailed guide on how to add a link to your Instagram story.
Common gotchas: the Link sticker can disappear if the app is outdated or your Account Status has restrictions. And the link may open in an in-app browser for some people, so make sure your Story promise matches the YouTube title and first seconds.
Add the YouTube link to Story Highlights
If the link should keep working after 24 hours, save the Story to Story Highlights. Post it, open Archive, add it to a Highlight, then name it something obvious like Start Here, Tutorials, or YouTube. Read in this article how to post a story and save, archive, and create highlights.
How to share from the YouTube app to Instagram
You can’t reliably post a full YouTube video into Instagram as a native file straight from YouTube. The realistic “direct share” is simpler: Share YouTube link, then paste it where Instagram actually supports links.
In YouTube, tap Share, then Copy link. From there, you have three clean destinations: your Story Link sticker, your profile Links section, or an Instagram DM. That’s the workflow YouTube is built for, and it’s the one that breaks the least across iPhone, Android, and desktop.
Source:
On iPhone and Android, the taps are basically identical: copy the link in YouTube, then switch to Instagram and paste it. On desktop, you’re usually copying from the browser address bar and pasting into your bio Links section or into Instagram web DMs.
One more option people overlook: YouTube’s QR code share can be useful in-person, but for online promotion it’s almost always slower than pasting the link into a Story or DM.
Fastest no-download flow for YouTube link to Story
This is the fastest way to post without saving files, and it’s also the cleanest when you’re deciding how to add video to Instagram story without actually uploading a clip.
- YouTube: Share, then Copy link
- Instagram: create a Story, tap Stickers, then Link
- Paste the URL and rename the sticker text to the benefit
- Post
Common fail: people copy a Shorts link and expect it to behave like a standard watch link. If taps feel “off,” grab the full watch URL from the Share menu again and retry.
Post a YouTube clip as an Instagram Reel
A Reel is where an Instagram video gets discovered. Your job is to turn one strong moment into a vertical clip that earns watch time and sends, then push viewers to the full YouTube video through your Story link or bio link.
Here’s the workflow I use:
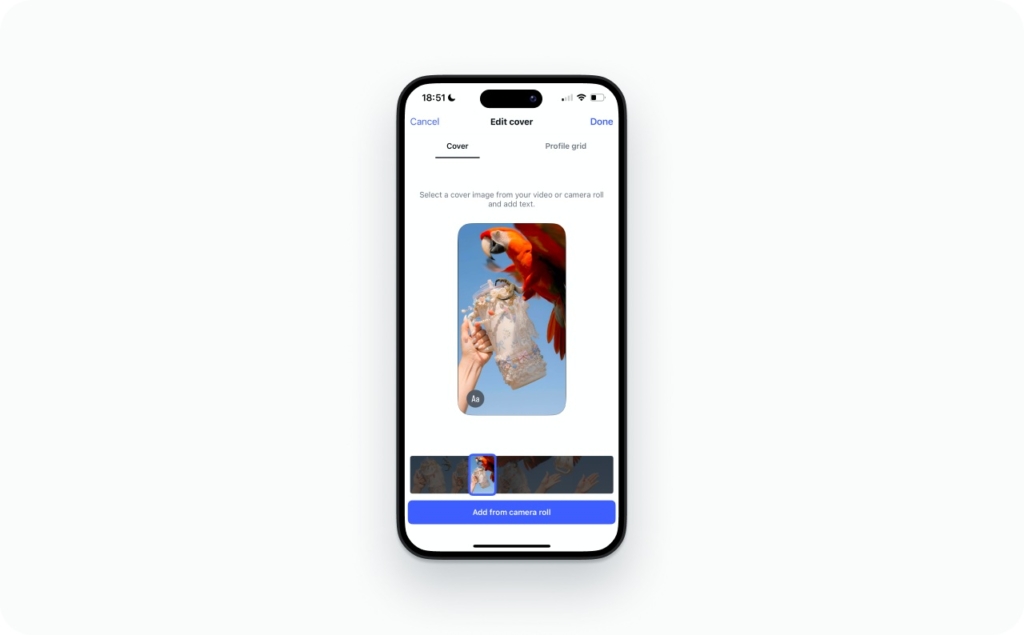
Download your own video (or export the segment from your editor). Pick one moment that stands alone, then trim it tight. Crop to 9:16, add captions, choose a clean cover, publish, then add a simple CTA that tells people where the full version lives.
If you’re splitting a longer video, keep the series obvious. Use “Part 1,” “Part 2,” “Part 3” in the on-screen text and the caption, and keep the naming consistent so people don’t get lost.
To avoid the reused-content look, change the first two seconds. Add a fresh hook line, refresh the captions, and swap in a bit of new B-roll or a zoom cut. Also remove watermarks before you upload. It’s not just aesthetics. It changes how your content feels.
How long should your clip be?
Match length to the job.
If you’re aiming for curiosity, keep it around 10–20 seconds with one punchy point. If you’re giving real value, 20–45 seconds is usually enough. If it’s a mini-tutorial, 45–90 seconds can work if every second earns its place.
One rule I stick to: one idea per Reel. If the clip needs three sentences of explanation, it’s probably two Reels. You may also like to find out how long can Instagram reels be.
Captions that help people finish the Reel
I prefer burned-in captions for reliability, because they travel better if you reuse the clip later. Instagram’s auto captions are still useful as a fast option, but I treat them as a backup.
Keep captions readable. Two lines max, with short lines that don’t cover faces or key visuals. Example format:
Line 1: the point
Line 2: the proof or next step
Small business examples
Line 1: Same-day hair appointments opened up
Line 2: Tap “Book” and pick your time
Line 1: This $29 lunch special sells out fast
Line 2: Today’s menu is in the Story link
Line 1: I can fix that leaking faucet today
Line 2: Text me “LEAK” and I’ll send a quote
Line 1: New client deal: $49 first facial
Line 2: Book it from the link in my bio
Line 1: We deliver cupcakes in 60 minutes
Line 2: Order by 3 PM for same-day delivery
Line 1: This is my most-requested lash set
Line 2: Save this and show it at your appointment
Line 1: 3-step home cleaning reset in 20 minutes
Line 2: Download the checklist from my bio
Line 1: Your dog’s nails don’t have to be stressful
Line 2: DM “NAILS” for this week’s openings
Line 1: I photographed this home in 30 minutes
Line 2: Want the shot list? It’s linked in my Story
Line 1: This tote fits a 13-inch laptop
Line 2: Tap to see colors and stock
If you’re looking to level up your Instagram game, the right caption can make all the difference. A strong caption grabs attention, adds personality to your post, and encourages engagement. Read more about these caption ideas that can inspire your next ad and help you connect better with your audience:
- Instagram captions ideas
A collection of versatile caption examples you can use for promotions, product launches, and everyday posts. - Captions by audience
Tailored caption ideas designed to resonate with different target audiences and customer segments. - Seasonal caption ideas
Creative captions inspired by holidays, seasons, and special occasions throughout the year. - Funny captions ideas
Lighthearted and humorous captions that add personality and make your brand more relatable. - Beach captions for Instagram ideas
Sunny, carefree caption ideas perfect for summer vibes, vacations, and seaside content. - Event-specific captions
Ready-to-use captions crafted for sales, launches, celebrations, and other key events.
How to convert horizontal YouTube videos to vertical without blurry crops
Most YouTube videos are horizontal. Instagram is built for vertical. Converting horizontal to vertical is a simple edit problem, but it punishes lazy crops.
You have three clean options.
- A center crop works when the subject stays in the middle.
- A smart reframe works when the subject moves, because it follows the speaker or product.
- A split-screen layout works when you need context, like face-cam on top and screen recording on the bottom.
Safe zones matter. Keep faces, subtitles, and key text away from the very top and bottom edges so they don’t get covered by interface elements. If your cover text looks perfect in your editor but gets clipped in the app, it’s usually a safe-zone issue, not a bad export.
For export settings, keep it boring and high quality: MP4 with H.264 video, AAC audio, 1080×1920, 30 fps, and a healthy bitrate. Don’t overcompress twice. If you export heavily, then Instagram compresses again, the clip will look soft fast.
How to add your YouTube link to Instagram Bio
Your bio is your steady traffic lane. If you publish regularly, treat it like a “current episode” slot.
Go to your profile, tap Edit profile, then Links, and add your newest link first. This is where link in bio actually earns its keep. Keep the text clean, and make the first link the one you want clicked today.
Use a single video link when you’re pushing one release. Use a playlist link when you want people to keep watching. Use your channel link when your catalog is strong and you want subscriptions.
Three “link in bio” lines that don’t feel spammy:
- “Full video is in my bio”
- “Watch the full step-by-step from my bio”
- “The complete demo is linked in my bio”
If you track, add UTMs to the bio link so you can separate bio clicks from Story clicks later.
Track clicks from Instagram to YouTube with UTMs
If you want to track clicks cleanly, use UTMs. A UTM is a short tag you add to a URL so analytics tools can label where traffic came from.
Use this pattern:
- utm_source=instagram
- utm_medium=social
- utm_campaign=video_title
Put UTMs on links you control: your Story Link sticker, your bio link, and the links you drop into DMs. Google’s URL builder exists for exactly this purpose, and the goal is simple: make sure your traffic shows up with the right labels in GA4.
Source:
What success looks like depends on your goal, but the basics are consistent: clicks from Instagram, YouTube traffic sources showing Instagram, and retention holding after the first 10–30 seconds. If clicks are high and retention is low, your Story or Reel promise may not match what the viewer lands on.
Fix what breaks: Links, uploads, blurry video, audio, cropping
When something fails, don’t try five random things. Match the symptom, apply the fastest fix, then move deeper only if needed.
Link sticker missing in Stories
- Update Instagram in the App Store or Google Play
- Force close the app, reopen
- Log out, log back in
- Check Settings and activity then Account Status for restrictions
- Try on a different network (Wi-Fi vs cellular)
What usually caused it: an outdated app, a temporary restriction, or a rollout delay.
“This link is not allowed” or “Try again later”
- Paste the plain URL (remove extra tracking and long parameters)
- Make sure it starts with https://
- Avoid link shorteners while testing
- Open the link in your phone browser first to confirm it loads
- If it redirects multiple times, use the final destination URL
What usually caused it: redirect chains, spam signals, or broken destination pages.
Instagram won’t accept the video file
- Re-export as MP4 (H.264 video + AAC audio)
- Keep the resolution standard:
- Reels: 1080×1920 (9:16)
- Feed: 1080×1350 (4:5) or 1080×1080 (1:1)
- Use 30 fps (or 29.97), not weird frame rates
- Keep the file size reasonable by raising bitrate gradually, not by exporting in 4K
What usually caused it: unsupported codec, odd resolution, variable frame rate, or a huge file.
Reel looks blurry after posting
- Upload from a strong connection (Wi-Fi is safer)
- Don’t upload a re-upload (no screen recordings, no downloaded-from-Instagram copies)
- Export once at high quality, then upload that master
- In Instagram settings, turn on Upload at highest quality (name may vary by device)
What usually caused it: double compression, low bitrate exports, or weak upload connection.
Audio out of sync
- Re-export at a constant frame rate (this is the big one)
- If you edited with multiple clips, render a single flattened file before uploading
- Test in a draft upload before publishing
What usually caused it: variable frame rate exports or heavy edits without a final render.
Cropping is weird or text gets cut off
- Keep key text and faces in the center safe zone
- Avoid placing text in the bottom band where captions and buttons sit
- Upload as a draft and preview on the cover screen and the grid
What usually caused it: safe-zone placement, not the export.
Safe-zone fixes when text gets cut off
Text gets cut off because Instagram puts UI on top of your video. Plan for it.
Use this safe-zone rule for 9:16 (1080×1920) Reels:
- Keep your important text and faces inside the center 80% of the frame
- Leave a buffer of about 250 px at the top and 350 px at the bottom for UI and captions
Do this now:
- In your editor, turn on a grid and move all key text toward the center
- If you have a title line, keep it in the upper-middle, not at the top edge
- Export and upload as a draft Reel
- On the preview screen, tap through the cover and caption screens and look for cutoffs
- If anything gets clipped, go back and shift the text up and inward, then re-export
Quick checks that save you re-uploads:
- If your caption is long, your bottom UI grows. Assume you need more bottom space
- If you add auto captions in Instagram, they often sit low. Leave extra room
- If you use a cover with text, check both the Reel preview and the profile grid crop
Read now a detailed guide about Instagram safe zones and learn how to properly position text, logos, and key visual elements so they don’t get cropped or covered by interface buttons. Understanding safe zone dimensions helps ensure your Stories, Reels, and posts look professional, fully visible, and optimized for maximum engagement across all devices.
FAQ
You can’t post a full YouTube link as a playable feed video. Download your own clip, trim to a strong 15–45 seconds, export in a feed-friendly ratio, then upload as a video post with a caption that pushes to your Story link or bio.
Use Reels for discovery and reach, because Instagram distributes Reels more aggressively than feed video for most accounts. Use feed video when you want grid consistency or a library post that supports your profile’s conversion path.
Yes. Paste the YouTube URL into an Instagram DM and add one sentence of context, like what they’ll learn or the timestamp to watch. DMs convert best when you personalize the message and avoid looking like a broadcast.
Usually no. Instagram comments are not a reliable place for clickable links, and some links won’t render as tappable. Use a pinned comment that says “Link in bio” or “Story link,” then make the link easy to find.
If you paste it in a caption, comment, or some profile fields, it may display as plain text. Links are most reliable in the Story Link sticker, the bio Links section, and DMs. Also double-check for typos and extra characters.
On desktop, copy the YouTube URL, then either update your Instagram bio link in your profile settings or message the link via Instagram DMs in a browser. For Stories and Reels, you’ll usually finish publishing from the mobile app.
Unlisted links work if the viewer has the exact URL, so they’re fine for Stories or DMs. Private videos won’t play for the public, even with a link. If you’re teasing a private upload, switch to unlisted.
Treat it like any long YouTube video: share the replay link in a Story, then post a Reel clip featuring the best moment plus a clear CTA. Live replays are long, so your Reel must do the “why watch” work.
Yes, as long as you own the content and export a clean file. Avoid reposting with visible watermarks because it screams reused. Refresh it with new captions, a new hook line, and a cover that matches your Instagram style.
Lead with a value-first Reel that delivers one complete takeaway, then offer the full YouTube video as the next step for details. That keeps engagement up while still sending high-intent viewers to YouTube through Stories and your bio link.

Emma blends product marketing and content to turn complex tools into simple, sales-driven playbooks for AI ad creatives and Facebook/Instagram campaigns. You’ll get checklists, bite-size guides, and real results, pulled from thousands of Zeely entrepreneurs, so you can run AI-powered ads confidently, even as a beginner.
Written by: Emma, AI Growth Adviser, Zeely
Reviewed on: March 2, 2026